Totallyamaha RX-1 M10 Install
|
|
|
|
|
|
Before beginning the installation, Totallyamaha recommends that you thoroughly read the installation package provided with your M-10, Be sure you understand all of the layout procedures described. Take your time with the layout, it is very critical that your new suspension be mounted parallel to the tunnel and perpendicular to the drive shaft. (If any of the information provided below conflicts with the installation package provided by M10, use the their information) Look through the parts that are provided and make sure you are not missing any mounting hardware.
1) Before unbolting the rear skid, remove the side panels to gain access to the front suspensions bolts. Now you can remove your pro-action skid frame by slightly elevating the rear of the sled so the track is about 2" off the ground. Using a 17 mm and 19 mm wrench loosen the rear shaft slightly. Take a 14 mm socket and ratchet and release the track tension, be sure to count the turns equally off the rear adjusters. (This will aid you in slipping the stock suspension back through the track.) Now remove the (6) 14mm bolts from the tunnel and the skid will fall to the floor. Then remove the 2 rear suspension brackets with a 14 mm wrench (4 additional 14mm bolts).
2)At this point it would be helpful to remove your seat. You will need to unplug the tail light power cable on the throttle side of the seat. Pull up the edge of the seat to expose the wire and unplug the harness to the tail light. Remove exhaust caps with a 5 mm Allen wrench (3 screws) One at 12 o'clock, one at 5 o'clock and one at 7 o'clock on each cap. Next remove the two Phillips head screw below your tail light lens and remove the exhaust grid in the rear of the seat. Once the grid is removed 2 gold hooks with 10 mm nuts that hold the seat in place should be exposed. Remove those 10 mm nuts and lift the seat while pushing the hooks through the retainer clips. Finally slide your seat from front to rear and remove the seat from sled.
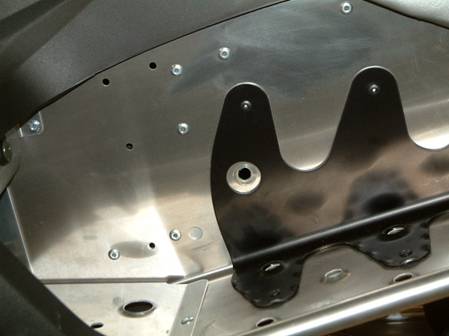
3) Starting on the inside of
the tunnel on the left hand side (LH), locate the black rear suspension
mounting plates. On the outside of the
tunnel remove the (2) bolts, (4) rivets and then the stock plate.
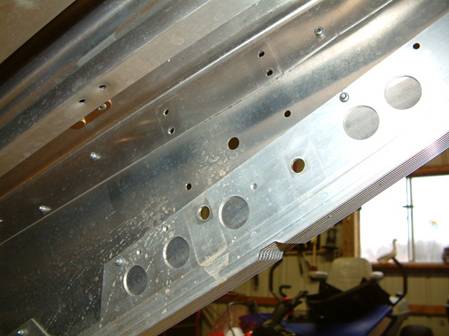
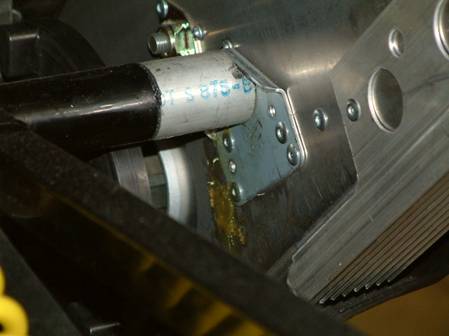
4) With the stock plate removed,
locate the two 3/16” holes pre-drilled in the heat exchanger. (see photo) Drill these holes out to
10.5MM. These will now be the new holes
to relocate the “stock black plates” into the tunnel.
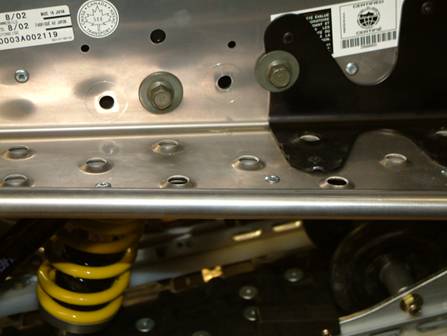
Temporarily bolt the plates into place on the inside of the tunnel.* Also from the inside of the tunnel, locate and drill the (2) holes at the bottom of the (4) rivet holes in each plate, through the tunnel. Install the 10-32 button head bolts provided from the outside of the tunnel.
NOTE: The LH & RH stock
plates will be bolted to the rear arm of the M-10 before installing into the
tunnel.
5)The stock suspension
front mount and locating hole will be used to mount the M-10 front arm. This hole will be enlarged 12MM
6) Repeat steps 4-5 for the right
hand (RH) of the tunnel.
7) *Using the nuts and bolts
provided, attach shocks to the M-10arms and torque to 35lbs*. Install the lower end of the limiter strap
in hole specified by the M-10 set- up card
*Note: Depending on how you have the sled elevated, it may be easier to install the upper shock mount to the arm after it is attached to the tunnel. Once the arm is bolted in the suspension can be moved into place with a floor jack under the track.
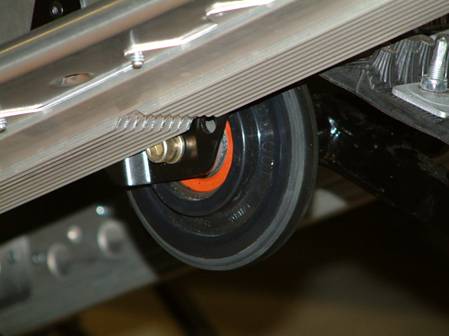
8) Install the shaft and spacers on the front M-10 arm. Install shaft, wheels and spacers on the rear M-10 arm. (Be sure to check note on wheel). This is a good time to grease the (4) fittings with low temp grease.
9) The LH and RH stock plates will be attached to the rear M-10 arms with the 7/16” allen bolts provided. The rear arm of the M-10 will use the stock hole already in the factory plates. With the bolts partially installed, but not tight, turn the suspension upside down on a flat surface such as the garage floor. Now use this surface to ensure that flat edges of the factory plate are aligned and parallel. Be sure to use the lock washers on these bolts only and torque each bolt to 35lbs.
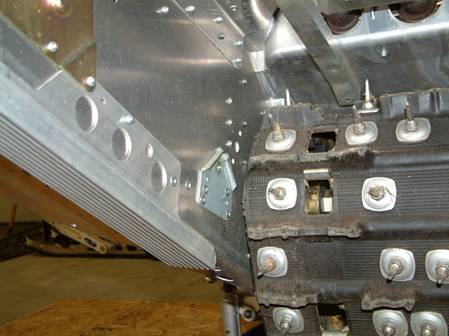
10) Place the M-10 in the track. You will need a couple pairs of hands for. Additionally, a floor jack and wood block are helpful for raising the suspension into place.
11) Install the front arm into place first. The front shaft has ends turned down and notched spacers. Be sure to align the open cut of the bushing “facing up” into the factory “v” of the stock tunnel mount. Using the bolts, lock washers, and flat washers provided, torque to 35lbs.
12) Lift up the rear of the M-10 and align the holes in the plates with the new locating holes drilled earlier. Install the original factory bolts to secure plates into tunnel.
13) Re-Install seat, plastic cover and tips.
14) M-10 Setup. Refer to the M-10 owners manual and ride set-up card to properly adjust the M-10 to rider weight and riding conditions.
Once the spring preload, spring lengths and sag are adjusted you are ready to ride. Please note: You will have to re-adjust slightly after you have ridden about 50-150 miles as the springs set in. Be careful with this re-adjustment and don’t forget. The M-10 is very forgiving and you may not notice that it has gotten softer but it will become quite easy to bottom out on bigger bumps if you don’t go back and readjust for the spring set in.
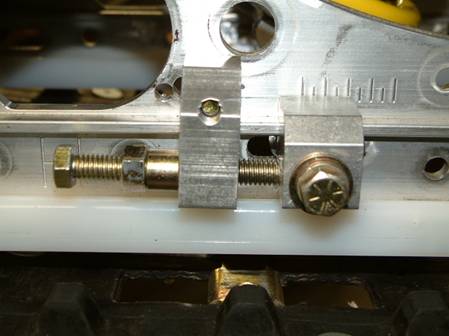
Beyond the initial adjustment you will only have to re-adjust for different riders or riding styles. This is accomplished by simply moving the FRA adjuster or JACK forward or back. This changes the angularity of your rear shock. The FRA takes about 5-10 minutes to adjust with a couple of wrenches. Whereas, the JACK can be adjusted in less than 30 seconds with a small crank you keep in your storage compartment. The JACK option makes going from an aggressive trail set-up to playing on the lake much easier. You can take out suspension preload for an improved holeshot in less than a minute.
CCPerformance.com & Totallyamaha.com would like to thank the Noble family for their hospitality and patience while making this installation and shoot-out possible.
Totallyamaha and CCPerformance is not responsible for any damages that these modifications may cause to your vehicle; any modifications are your responsibility if you choose to do so. We are providing information ONLY. Some of these modifications may VOID your warranty and that is your responsibility to look into. The Totallyamaha users have passed along most of the information found on this site. If you have any questions or concerns about anything on this site talk to your dealer before using any of the information. Totallyamaha will not be liable for any damages or personal injury from any modification performed from this site.
Please let us know if you have anything to add to this page to help out other Yamaha owners. For addition to this page Email webmaster@totallyamaha.com
![]()