Viper Seat
Riser Redefined
By viper7mi
One of my summer projects
was to build a seat riser.
My riser is a combination of
seat riser and extra foam mod seat top for under $27 bucks.
Seat Riser Materials:
Dimension 2" in front
and 3" in rear
2 pieces of 1/4 plywood -
cut to underside of seat: $6
1 1/2 x 14 of trim wood for
front of riser: $1.50 1" plastic pipe cut on angle to 2 1/2 for rear
bolts:
.67c
3 - Cans of expand foam that
hardens (red can): $15
2 - 55mm bolts 10.9: free
2 - 55mm coupler nuts: free
2 - 1/2 plastic washers:
free
7 - Sticks of hot glue
sticks: $2.00
Vinyl: free
Foam 1": $3.60
1" - Galvanized steel
strap: $3.00
Closed cell dense foam: $ 4.50
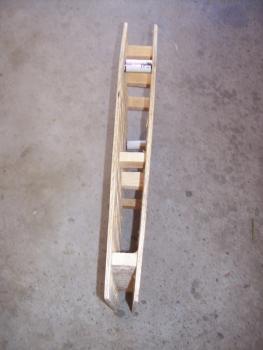
1st Step:
Cut the front wood support
and the rear plastic supports measured to get the spec of 2" in the front
and 3" in the rear edge. Drill a
hole for the rear bolts. The plastic
supports will go over the hole.
Cut extra wood
supports: 3 pieces in the center and 4
pieces in the rear past the plastic supports.
Screw the supports in the top and bottom. Hot glue all supports.
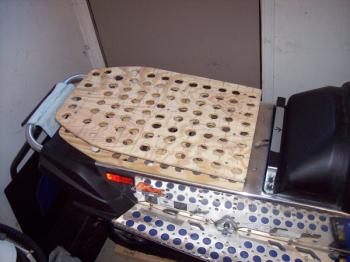
Drill 1" holes: 8 across from front to back, top and bottom.
Spray foam the riser and let
DRY for 24 hours. Keep and eye on the
rise of the foam so the riser does not expand.
Cut off excess foam and paint.
Use 1" foam around the edge.
On one side make a 1/2" edge that goes around the top edge to cover
the gap. Then staple the vinyl over the foam.
Duck tape the staples.
The steel strap is measured
to the riser and seat height tabs and fastened by using the gas tank bolts.
Cut the closed cell foam to
fit around the edge of the tank to take up the gap between the seat and the
tank.
Assemble the riser by using
a plastic washer, existing seat nuts and coupler nuts to the seats old
studs. Seat riser and seat and bolts
with plastic washers.
Foam 1" added to the
top of the Seat:
Bought a 1" thick x
14" x 20" to the top of the Viper seat. Use mesh sandpaper used for drywall sanding to sculpt the edge to
a bevel 45 degree on the sides. Take
the seats front staples out. I wrapped
the foam in a slippery packing paper and put it in the seat. Positioned it to the exact spot and pulled
out the paper. I used super sticky
double sided tape in between the foam the full length in 3 strips.
Re-staple. Make sure you have room to add the foam to
your seat.
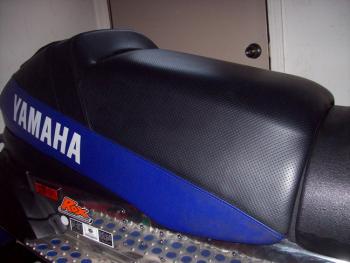
The combination of the seat
riser and foam gives the seat a close 3" in the front and 4" in the
rear.
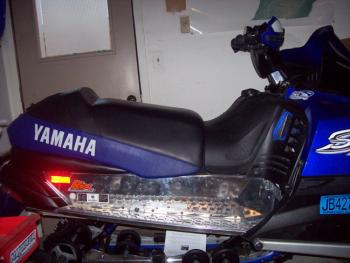
Overall, the seat fits great
and gives the sled a more rider forward position for me.
The pictures show the seat
completed, wood with the holes, and supports prior to foam. Bracket for the lip of the seat that fastens
to the tank bolts.
Thanks to Bearit for
original concept.
Totallyamaha is not responsible for any damages that these modifications may cause to your vehicle; any modifications are your responsibility if you choose to do so. We are providing information ONLY. Some of these modifications may VOID your warranty and that is your responsibility to look into. The Totallyamaha users have passed along most of the information found on this site. If you have any questions or concerns about anything on this site talk to your dealer before using any of the information. Totallyamaha will not be liable for any damages or personal injury from any modification performed from this site.
![]()