Warrior Marginal Wheel Replacement
by:rockmeister
Greatly reduce the wear
on your slides (Hyfax) for free (almost)!
I have seen multiple people on this awesome site say that the reason people wear
out their sliders
so quickly is riding in "marginal" conditions and its their own fault...
Realistically, Snowmobiling depends on a number of factors.
Mainly the following;
1)Time, you must have time to do it.
2)Money, this speaks for itself! lol
3)Access, you must have access to trails/areas that are legal to ride.
4)SNOW! Sounds easy, yet look at the past December & January!
Many times we have the first 3, and yet the conditions are "marginal" at best!
So our choices are, ride in marginal conditions, or don't ride!
I would rather ride marginal conditions with a smile than not ride at all!
I own a RX-1 Warrior that eats sliders! (One 500 mile trip can trash them!)
Mainly towards the front at the curve and to a much lesser extent,
directly below the snubbers near the rear third of the rails.
I have an Arctic Cat EXT and a ZR that basically did the same thing.
I fixed the problem on them, and am doing the same on the Warrior.
I have seen multiple possible fixes that I'm sure help, yet don't entirely
offer a solution.
They include:
1) Marginal snow wheel kit. Kinda costly, and not very dependable from what I
have read.
Because of the smaller wheel, they spin a relatively weak bearing even faster,
and the radius of the wheel
means it has less benefit over a shorter distance on the track/slider.
2) Larger wheels. I believe this has good possibilities, especially with the
stronger 6205 bearing.
Although, even the larger wheels in the wrong location offer a lesser benefit.
3) Run your track loose. Been there, done that. You shouldn't have to put up
with ratcheting and STILL eat sliders!
4) Cut-out closed track windows & fully clip track.
Am planning on this next.
5) Super amounts of snow for superior non-stop lubrication.
Great idea! Talk to GOD. lol
The following is what I am doing to correct the problem at the front of the
rails.
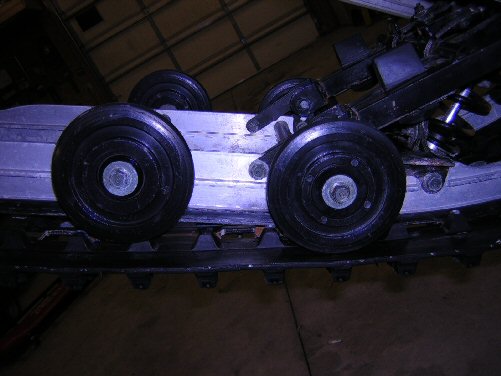
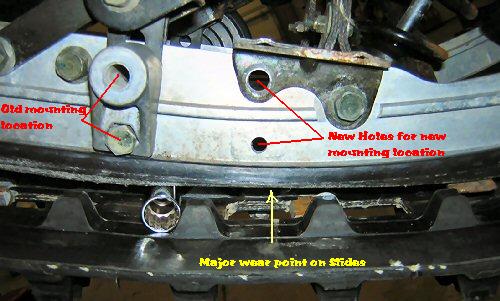
Next time you replace your sliders, look at where they wear the most, its right
at the apex of the radius near the front of the rails.
THAT'S where you need your front wheel to be!
For a few dollars (literally $3) you can put them where they should have been to
start with!
Basically I re-located them approximately 3" further forward almost Exactly at
the apex of the turn, right where the sliders wear so badly!
Tools required:
Drill
7/16" drill bit
3/8" drill bit
5/16" drill bit
1/8" drill bit
12, 14, & 17mm combination wrenches & sockets.
You will re-use most fasteners.
Will need to purchase:
2 bolts M10-1.50x30
2 Stop Nuts (nylon insert locknuts) M10-1.50
4 M10 Flat washers
2 M10 Lock Washers
Blue Loctite
You need reasonable mechanical skills.
You will enlarge one hole in your rail and drill one new hole.
The rest is simple bolts.
Yes, that's it!
Personally, I like the corrosion resistance and the fine thread of the factory
fasteners,
however, I wanted to get it done, so I used the lesser hardware store fasteners.
I suggest blue loctite on all fasteners.
Procedure:
REMOVE EXISTING FRONT WHEEL

Un-bolt the existing front wheel.
(I suggest doing only one side at a time, as the bracket in front may be under
spring tension.)
Unbolt the wheel bracket by removing nut on backside of lower bolt.
Install new M10-1.50x10 bolt with flat washer on both sides of the rail and lock
washer on stop nut side and tighten.
PREP NEW LOCATION OF FRONT WHEEL
DRILL TOP WHEEL MOUNT HOLE
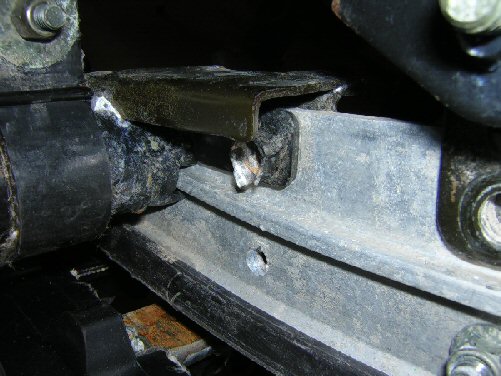
Remove REAR bolt ONLY out of black W Arm Snubber Bracket in front of old wheel
location. (see pics)
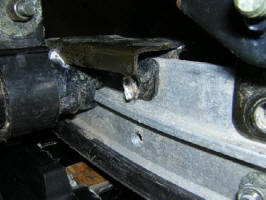
(nut on backside was welded in place on mine, you will Not re-use this bolt)
Predrill this rear hole through the bracket with 3/8" drill bit.
Finish drill hole with 7/16" drill bit. (10MM could be better)
(I know, its not 10MM, yet it's close & I have plenty of metric fasteners, and
hardly any metric drill bits!)
MARK & DRILL LOWER WHEEL MOUNT HOLE
Temporarily install wheel bolt through wheel bracket and hole to align bracket
for marking of lower mounting hole.
Use the thickness of a matchbook between the slider & wheel mount bracket to get
the wheel bracket up off the slider.
This will make it "easier" to replace the sliders later.
Mark for the lower hole location.
Remove the wheel bracket and center punch the lower bolt drill location.
Pre-drill lower mounting hole with a 1/8" drill bit.
Finish drill lower mounting hole with a 5/16" drill bit.
CLEAN DRILL SHAVINGS UP & MOUNT WHEEL IN NEW LOCATION
After cleaning shavings, Install original lower mounting bolt through wheel
mount and thread nut onto bolt on backside of rail.
Tighten lower mounting bolt, then back off just enough to allow mount to move as
needed to align upper mounting bolt.
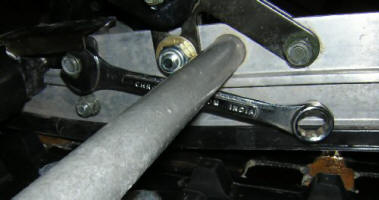
Install original upper mounting bolt with original washers on each side of
wheel, and install nut on backside.
(You will most likely need to pull bolt back about 1/4" to allow nut to be
started, due to a lip on the top backside of the bracket.)
Finger tighten upper mounting bolt onto nut making sure it is threaded on
properly.
(You will need to use a 14mm open end wrench to hold nut on backside due to lip
on backside of bracket, see pics)
Tighten both upper AND lower fasteners, making sure you have at least one full
thread protruding out of nut on upper bolt.
REPEAT ON OTHER SIDE AND DOUBLE CHECK TIGHTNESS OF ALL FASTENERS
That's it!
6 bolts, 4 holes(2 new ones) and your wheel in NOW in the right spot!
With NO additional weight either! (Well, 2 bolts & nuts)
This should take about an hour to fully complete.
The welded on bracket nut:
I suggest using a Dremel tool to remove what is left of the nut after drilling
the top hole out.
I seriously tightened the upper bolt & will re-check it to be sure it stays
tight.
Conclusions:
Riding 800 miles in the UP of Michigan through varing conditions ranging from
marginal to great, have shown no interference, etc.
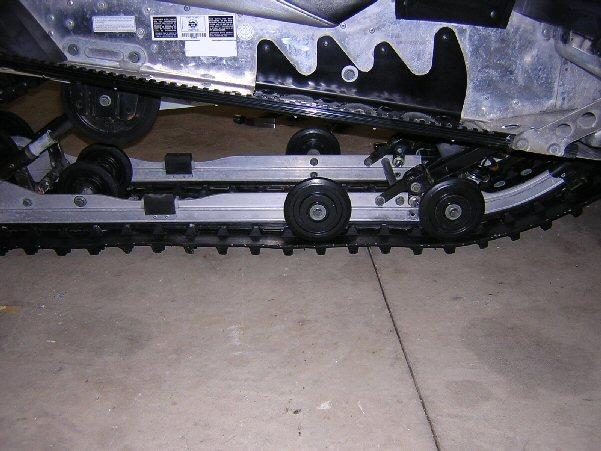
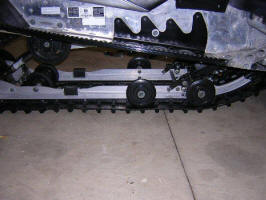
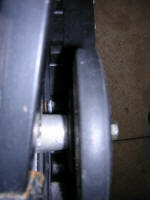
As you can see in the pics, there is plenty of room for the wheel as the
suspension goes through its full travel.
I installed a brand new set of sliders after the pics were taken, so I would
know the exact wear after the modification.
After almost 1000 miles, what a difference! I STILL HAVE SLIDERS!!! : )
In the future I am looking at fixing the wear spot at the rear rail snubber
location.
There is no way I have found yet to put a wheel exactly where it's needed on the
rear, but maybe larger wheels
and adding an additional set may take care of it?
Am contemplating moving the 2nd set forward approx 3" and adding an additional
set of wheels behind them.
I am providing this information to explain what I did,
any use you make of it is at your own risk, and I am in no way responsible for
the information and/or the outcome of your actions.
Totallyamaha is not responsible for any damages that these modifications may
cause to your vehicle; any modifications are your responsibility if you choose
to do so. We are providing information ONLY. Some of these modifications may
VOID your warranty and that is your responsibility to look into. The
Totallyamaha users have passed along most of the information found on this site.
If you have any questions or concerns about anything on this site talk to your
dealer before using any of the information. Totallyamaha will not be liable for
any damages or personal injury from any modification performed from this site.